
Text-to-Speech
As software development becomes more complex and fast-paced, it is crucial to have an efficient and automated process for building, testing, and deploying code changes to production environments. Continuous Integration and Continuous Deployment (CI/CD) pipelines are essential tools for achieving this goal. In this article, we will walk through the process of setting up a CI/CD pipeline for a Django application using Jenkins and Digital Ocean, with Slack integration for notifications related to deployments.
Step 1: Introduction
What is a CI/CD Pipeline?
CI/CD Pipeline stands for Continuous Integration and Continuous Deployment. It is a set of practices that automate the entire software delivery process. The CI/CD Pipeline starts with Continuous Integration, which involves integrating code changes into a shared repository. This process is followed by Continuous Deployment, which involves automatically deploying the code changes to production servers.
Benefits of CI/CD Pipeline: The benefits of CI/CD Pipeline are numerous. Firstly, it helps in reducing the time required to deliver software changes. By automating the entire software delivery process, developers can focus on writing code, while the CI/CD Pipeline takes care of the rest. Secondly, it ensures that software changes are thoroughly tested before they are deployed to production servers. This helps in reducing the risk of bugs and errors in the software. Finally, CI/CD Pipeline helps in improving collaboration between developers and operations teams.
Components of CI/CD Pipeline: The CI/CD Pipeline consists of various components, including:
Source Control Management (SCM): SCM is a software tool that helps in managing changes to code. It provides a centralized location for storing and tracking changes to code.
- Build Tools: Build Tools are software tools that automate the process of building and packaging software. Some popular build tools include Maven and Gradle.
- Continuous Integration Server: The Continuous Integration server automates the process of building, testing, and deploying code changes.
- Automated Testing: Automated testing involves writing test cases that are automatically run to ensure that software changes are free of bugs and errors.
- Continuous Deployment: Continuous Deployment involves automatically deploying code changes to production servers.
Conclusion: In conclusion, the CI/CD Pipeline is a set of practices that helps in the automation of the software delivery process. It helps in reducing the time required to deliver software changes, ensures that software changes are thoroughly tested before they are deployed, and improves collaboration between developers and operations teams. By following the best practices of CI/CD Pipeline, organizations can deliver high-quality software in a fast and efficient manner.
What is Jenkins?
Jenkins is an open-source automation server that helps in automating various tasks related to software development. It is a powerful tool that can be used for continuous integration, continuous delivery, and continuous deployment. Jenkins is built using Java and can run on various platforms, including Windows, Linux, and macOS.
Features of Jenkins:
Jenkins has several features that make it a popular choice among developers. Firstly, it is open-source, which means that it is free to use and can be customized to suit the needs of the organization. Secondly, Jenkins supports various programming languages and tools, including Java, Python, Ruby, and Git. This makes it a versatile tool that can be used in different software development environments. Finally, Jenkins has a plugin-based architecture, which means that it can be extended to support various use cases.
Benefits of Jenkins:
The benefits of Jenkins are numerous. Firstly, it helps in automating various tasks related to software development, including building, testing, and deploying code changes. This helps in reducing the time required to deliver software changes. Secondly, Jenkins provides real-time feedback on the status of the software delivery process, which helps in identifying and resolving issues quickly. Finally, Jenkins provides a centralized location for managing the software delivery process, which helps in improving collaboration between developers and operations teams.
How to use Jenkins?
To use Jenkins, you need to install it on a server or a virtual machine. Once installed, you can configure it to automate various tasks related to software development. This includes configuring Jenkins to fetch code changes from a source control repository, building and testing the code, and deploying the code changes to production servers.
Conclusion:
In conclusion, Jenkins is an open-source automation server that helps in automating various tasks related to software development. It is a versatile tool that supports various programming languages and tools, has a plugin-based architecture, and provides real-time feedback on the status of the software delivery process. By using Jenkins, organizations can deliver high-quality software in a fast and efficient manner.
Part 01: Django App Server Setup
Step 1: Creating a VPS(Droplet) on Digital Ocean
Go to https://cloud.digitalocean.com/droplets and click on Create Droplet the button. Then, select Ubuntu 16.04
You can give the name as an app-server.
Step 2: Installing dependencies
#!/bin/bash

# Update
sudo apt update

# Install Nginx
sudo apt install -y nginx

# Install Python
sudo apt install -y python3 python3-pip

# Install Virtualenv
sudo pip3 install virtualenv

# start Nginx
sudo systemctl start nginx
sudo systemctl enable nginx

# It reloads the systemd manager configuration.
sudo systemctl daemon-reload
Step 3: Setting up our project and its environment
ssh to your server using the terminal.
Clone Your Django Project and create a virtual environment inside that directory.
git clone https://github.com/codewithmuh/drfblogproject.git
cd projectdirectory

then

virtualenv env
A virtual environment named env will be created. Let’s activate this virtual environment:
source env/bin/activatepip install -r requirements.txt
pip install django gunicorn
This installs Django and gunicorn in our virtual environment
Add your IP address or domain to the ALLOWED_HOSTS variable in settings.py.
If you have any migrations to run, perform the action:
python manage.py makemigrations
python manage.py migrate
python manage.py collectstatic
Import Thing about static files, You must make sure to add few lines in your seeting.py file.
- add this line “whitenoise.runserver_nostatic”, into your Installed_apps of setting file.
- add ‘whitenoise.middleware.WhiteNoiseMiddleware’, into MiddleWare of your setting File.
- Also, add these lines at the bottom of the blog/urls. py file.
if settings.DEBUG:
    urlpatterns += static(settings.MEDIA_URL, document_root = settings.MEDIA_ROOT)
    urlpatterns += static(settings.STATIC_URL, document_root = settings.STATIC_URL)
4. Also, add these imports lines at the top of the blog/urls. py file.
from django.conf import settings # newfrom django.conf.urls.static import static #new5. Run this command
$ pip install whitenoise
Configuring gunicorn
Deactivate the virtual environment by executing the command below:
deactivate
Let’s create a system socket file for gunicorn now:
sudo vim /etc/systemd/system/gunicorn.socket
Paste the contents below and save the file
[Unit]
Description=gunicorn socket

[Socket]
ListenStream=/run/gunicorn.sock

[Install]
WantedBy=sockets.target
Next, we will create a service file for gunicorn
sudo vim /etc/systemd/system/gunicorn.service
Paste the contents below inside this file:
[Unit]
Description=gunicorn daemon
Requires=gunicorn.socket
After=network.target
[Service]
User=root
Group=www-data
WorkingDirectory=/root/YourProjectDirectoryName
ExecStart=/root/YourProjectDirectoryName/env/bin/gunicorn \
          --access-logfile - \
          --workers 3 \
          --bind unix:/run/gunicorn.sock \
          yourSettingsFileFoldername.wsgi:application
[Install]
WantedBy=multi-user.target
Lets now start and enable the gunicorn socket
sudo systemctl start gunicorn.socket
sudo systemctl enable gunicorn.socket
Configuring Nginx as a reverse proxy
Before You create Nginx File.
With this command, you can check if a file already exists.
cd /etc/nginx/sites-enabled
You can delete the existing default file using the command.
sudo rm -f FileName
Create a configuration file for Nginx using the following command
sudo vim /etc/nginx/sites-available/blog
Paste the below contents inside the file created
server {
    listen 80 default_server;
    server_name _;
    location = /favicon.ico { access_log off; log_not_found off; }
    location /YourStaticFilesDirectoryName/ {
        root /root/YourProjectDirectoryName;
    }
    location / {
        include proxy_params;
        proxy_pass http://unix:/run/gunicorn.sock;
    }
}
Create a configuration file for Nginx using the following command
sudo ln -s /etc/nginx/sites-available/blog /etc/nginx/sites-enabled/
Run this command to load a static file
$ sudo gpasswd -a www-data username
Restart Nginx and allow the changes to take place.
sudo systemctl restart nginx
sudo service gunicorn restart
sudo service nginx restart
Part 02: CI/CD Pipeline
If you go to the root folder of the project (My Github Repo)you will see a file named Jenkinsfile:
you can add this file to your project as well.
#!groovy


node {

    try {
        stage 'Checkout'
            checkout scm

            sh 'git log HEAD^..HEAD --pretty="%h %an - %s" > GIT_CHANGES'
            def lastChanges = readFile('GIT_CHANGES')
            slackSend color: "warning", message: "Started `${env.JOB_NAME}#${env.BUILD_NUMBER}`\n\n_The changes:_\n${lastChanges}"

        stage 'Test'
            sh 'virtualenv env -p python3.10'
            sh '. env/bin/activate'
            sh 'env/bin/pip install -r requirements.txt'
            sh 'env/bin/python3.10 manage.py test --testrunner=blog.tests.test_runners.NoDbTestRunner'

        stage 'Deploy'
            sh './deployment/deploy_prod.sh'

        stage 'Publish results'
            slackSend color: "good", message: "Build successful: `${env.JOB_NAME}#${env.BUILD_NUMBER}` <${env.BUILD_URL}|Open in Jenkins>"
    }

    catch (err) {
        slackSend color: "danger", message: "Build failed :face_with_head_bandage: \n`${env.JOB_NAME}#${env.BUILD_NUMBER}` <${env.BUILD_URL}|Open in Jenkins>"

        throw err
    }

}
This is where all the steps that Jenkins should follow are described. Let’s break it down.
- Checkout: The code repository is cloned to the Jenkins agent where the pipeline is executed.
- Test: A virtual environment is created with Python 3.10 and the required dependencies are installed. Then the tests are run using a custom test runner called “NoDbTestRunner”.
- Deploy: The script deploys the code to a production environment using a script called “deploy_prod.sh”.
- Publish results: A message is sent to the Slack channel to inform that the build was successful and provides a link to the Jenkins build page.
If an error occurs during any of the stages, the pipeline sends an error message to the Slack channel, and the pipeline fails.
Now, let’s see what is inside that deployment script:
#!/bin/sh

ssh root@128.199.25.122 <<EOF
  cd drfblogproject
  git pull
  source /opt/envs/drfblogproject/bin/activate
  pip install -r requirements.txt
  ./manage.py makemigrations
  ./manage.py migrate  --run-syncdb
  sudo service gunicorn restart
  sudo service nginx restart
  exit
EOF
The script does the following:
- Connect to the remote server at the IP address as the root user.
- Navigate to the “drfblogproject” directory.
- Pull the latest changes from the Git repository.
- Activate a virtual environment located at “/opt/envs/drfblogproject/bin/activate”.
- Install the Python dependencies listed in “requirements.txt”.
- Create new database migrations using Django’s “makemigrations” command.
- Apply any pending database migrations using Django’s “migrate” command with the “ — run-syncdb” flag.
- Restart the Gunicorn server to apply any changes made to the code.
- Restart the Nginx web server to ensure that the updated code is served.
Once all the commands have been executed, the script exits the remote server.
Create a new server and install Jenkins
Create a droplet with the only difference of name. Name it Jenkins-server. Wait a few seconds and when your server is ready, ssh into it:
ssh root@192.261.166.216 // replace this IP address with yoursInstall Jenkins:
# installing jenkins on Ubuntu 22.04 LTS (Droplet Digital Ocean)

# 1. Update the package index on your server:
sudo apt-get update

# 2. Install the default-jdk package, which provides the Java Development Kit:
sudo apt-get install default-jdk


# 3. Verify that Java is installed correctly by checking its version:
java -version

# This should output the version of Java that you just installed.

#4. Add the Jenkins repository key to your system:
wget -q -O - https://pkg.jenkins.io/debian-stable/jenkins.io.key | sudo apt-key add -

# 5. Add the Jenkins repository to your system:
sudo sh -c 'echo deb https://pkg.jenkins.io/debian-stable binary/ > /etc/apt/sources.list.d/jenkins.list'

#6. Update the package index on your server again:
sudo apt-get update

#7. Install Jenkins:
sudo apt-get install jenkins

#8. Start the Jenkins service:
sudo systemctl start jenkins


#9. Enable the Jenkins service to start automatically at boot:
sudo systemctl enable jenkins

#10. Verify that Jenkins is running by checking its status:
sudo systemctl status jenkins

# This should show that Jenkins is active and running.

#You should now be able to access the Jenkins web interface by going to
http://your_server_ip:8080 in your web browser.

#To get your administrator password, run this command to get it.
 sudo cat /var/lib/jenkins/secrets/initialAdminPassword


 # Install Python
sudo apt install -y python3 python3-pip

# Install Virtualenv
sudo pip3 install virtualenv
Now, if you go to JENKINS_IP_ADDRESS:8080 on your browser, you should see Jenkins up and running:
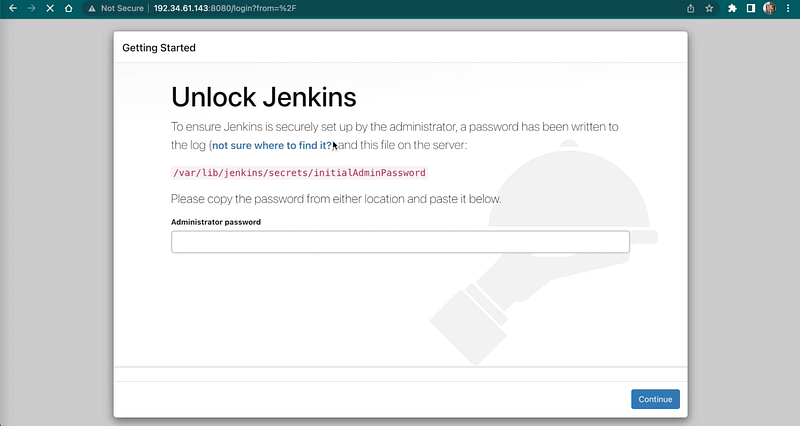
To get your administrator password, run this command to get it.
$ sudo cat /var/lib/jenkins/secrets/initialAdminPasswordThis will output your administrator password. The username associated with this password is admin in case you want to log in with this user. Once you input your administrator password you get a page asking for the installation of plugins.
Select Install suggested plugins to install some standard plugins that will help during your pipeline setup. Once the installation is done you are asked to create a normal user.
After creating the user, you are asked to set your Jenkins URL. Leave it as default and now you should be logged in.
Make sure Github and Slack Plugin are Installed on jenkins.
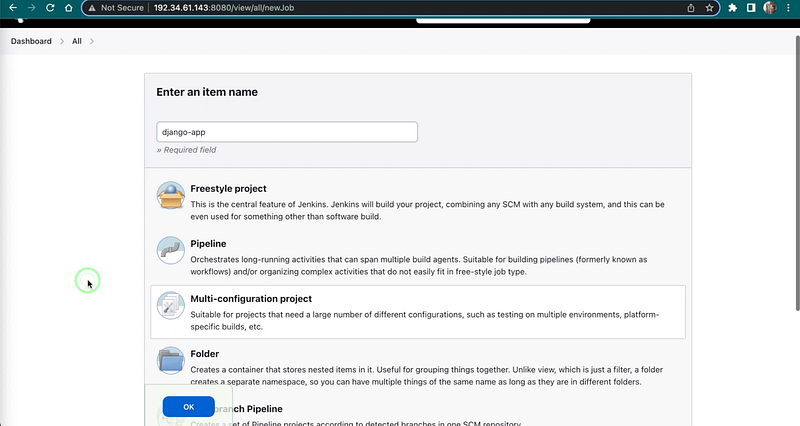
Set up a Jenkins Job
Click on New Item or create new jobs to get started.
On the new job page, name the item Django-app and choose Multibranch pipeline:
On the configuration page, click on Add source and choose Git. Fill in the details of your repository in Github. Then, check Periodically if not otherwise run and leave the interval of 1 minute:
Click Save. You will see that Jenkins will immediately start to build the project. As we chose Multibranch mode, it will start to build for all branches. However, you will see that both branches will fail:
After it restarts, log in.
We also need to install Jenkins plugin on the Slack side. Assuming you already have a slack team, go to https://my.slack.com/services/new/jenkins-ci. There, choose channel and click on Add Jenkins CI integration:
On the bottom of the next page, you will find some settings such as your Jenkins integration token. Save settings. Now, open another browser window. Go to your Jenkins server, navigate to Manage Jenkins -> Configure System and find Global Slack Notifier Settings there. Fill in team subdomain, integration token and channel:
Save!
If you did everything correctly, slack messaging will work now. However, there are a couple more things we should do to avoid more errors. First of all, we should install virtualenv for python:
ssh root@104.236.57.112  // replace this with the IP of your own Jenkins server
apt install python3-pip
pip3 install virtualenv
And there is one last thing that we should do. As we saw in the deployment script, we are sshing from the Jenkins server to the drfblogproject app server. However, it is not allowed yet. To allow this, we need to add the public key of the Jenkins server to the authorized keys of the app server. To do that, log in as jenkins user coz this is the user that will be running the jobs:
sudo su - jenkins
Type this and do not enter the passphrase:
ssh-keygen -t rsa

cat ~/.ssh/id_rsa.pub
Open ~/.ssh/id_rsa.pub and copy the content. Now, in another terminal tab ssh into the app server:
ssh root@104.236.57.112   // replace the IP with your app server
 mkdir -p ~/.ssh
 nano ~/.ssh/authorized_keys  #past conent here, which you copies earlier
chmod 600 ~/.ssh/authorized_keys
Now, check if you can ssh into the app server from the Jenkins server as the user jenkins. From the previous tab, type this:
ssh root@104.236.57.112 // replace the IPType yes and you should see that you are connected without any password. Congrats! We should be all set.
Time to check!
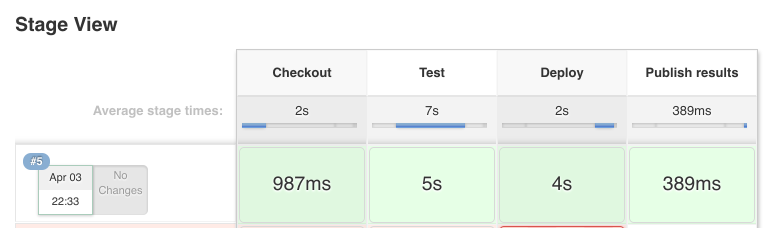
Navigate to Jenkins root -> Django-app-> master and once there click on Build now to start a build manually:
And you will see that it will start a build and go through all 4 stages we describe at the beginning:
If you go to your Slack, you should see some messages in # channel:
Done.
If you enjoyed my article, show your appreciation with a round of applause! 👏 Your support means the world to me!
Feel free to connect with me across various social media channels! Join me on LinkedIn, YouTube, Twitter, GitHub, and Upwork. Your support means a lot. Thanks for taking the time to read this!
Comments
No comments yet. Be the first to comment!